Custom View Button Widget

By using Custom view class We can create custom widget for our Application. Android Studio provides lot of widgets like Button, SearchView, DatePicker etc.. At the time we want some specific designed widgets with logical adjustments means we go for creating custom view widgets. We can create a new view or we also override existing view class.
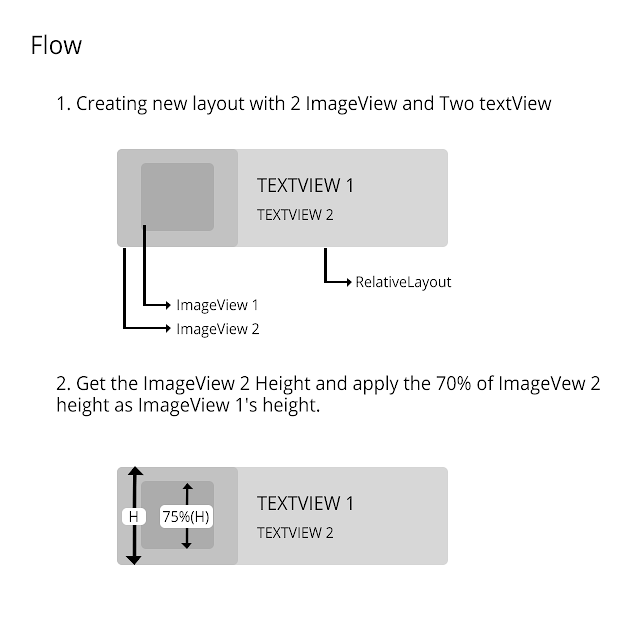
In this tutorial I override with RelativeLayout. I also tried Controlling the widgets by attributes, and widget auto adjusting logic.

1. Start with creating new android Studio Project with an empty Activity.
2. Import necessary drawables
3. Colors used
<color name="Color1a">#95d90b</color>
<color name="Color2a">#de9407</color>
<color name="Colora">#131944</color>
card.xml<?xml version="1.0" encoding="utf-8"?>
<RelativeLayout xmlns:android="http://schemas.android.com/apk/res/android"
android:id="@+id/layout_bg"
android:layout_width="match_parent"
android:layout_height="120dp"
android:background="@color/Color1a">

<ImageView
    android:id="@+id/thumbnail"
    android:layout_width="wrap_content"
    android:layout_height="match_parent"
    android:adjustViewBounds="true"
    android:scaleType="centerInside"
    android:src="@drawable/chip_circuit" />

<LinearLayout
    android:id="@+id/linearLayout3"
    android:layout_width="match_parent"
    android:layout_height="match_parent"
    android:layout_toRightOf="@+id/thumbnail"
    android:gravity="center_vertical"
    android:orientation="vertical"
    android:paddingLeft="10dp">

    <TextView
        android:id="@+id/header"
        android:layout_width="wrap_content"
        android:layout_height="wrap_content"
        android:layout_toRightOf="@+id/thumbnail"
        android:text="TEXTVIEW 1"
        android:textColor="@android:color/white"
        android:textSize="21dp" />

    <TextView
        android:id="@+id/description"
        android:layout_width="wrap_content"
        android:layout_height="wrap_content"
        android:layout_below="@+id/header"
        android:text="TEXTVIEW 2"
        android:textColor="@color/Colora"
        android:textSize="16dp"
        android:textStyle="bold" />
</LinearLayout>

<ImageView
    android:id="@+id/icon"
    android:layout_width="wrap_content"
    android:layout_height="match_parent"
    android:padding="25dp"
    android:layout_alignParentLeft="true"
    android:layout_toLeftOf="@+id/linearLayout3"
    android:adjustViewBounds="true"
    android:scaleType="centerInside"
    android:src="@drawable/icon_alarm" />

</RelativeLayout>
5. Create new xml file under values folder called "attrs.xml".attrs.xml<?xml version="1.0" encoding="utf-8"?>
<resources>
<declare-styleable name="Card">
<attr name="my_title_1" format="string" />
<attr name="my_title_2" format="string" />
<attr name="my_icon" format="reference" />
<attr name="my_bg" format="reference" />
</declare-styleable>
</resources>
6. Create new class for view.Card.javapackage androidramp.blogspot.customviewbuttonwidget;
/**
* Created by Thanvandh on 11-11-2015.
*/
import android.content.Context;
import android.content.res.TypedArray;
import android.graphics.drawable.Drawable;
import android.util.AttributeSet;
import android.widget.ImageView;
import android.widget.RelativeLayout;
import android.widget.TextView;
public class Card extends RelativeLayout {
private String stringHeader_1;
private String stringHeader_2;
private Drawable drawableIcon;
private Drawable drawableLoyoutBg;
private TextView textView1;
private TextView textView2;
private ImageView icon;
private RelativeLayout layout;
public Card(Context context) {
super(context);
init();
}
public Card(Context context, AttributeSet attrs) {
super(context, attrs);
init(context, attrs);
}
private void init() {
inflate(getContext(), R.layout.card, this);
this.textView1 = (TextView) findViewById(R.id.header);
this.textView2 = (TextView) findViewById(R.id.description);
this.icon = (ImageView) findViewById(R.id.icon);
this.layout = (RelativeLayout) findViewById(R.id.layout_bg);
}
private void init(Context context, AttributeSet attrs) {
init();
// Getting the attributes.
TypedArray a = context.getTheme().obtainStyledAttributes(attrs,
R.styleable.Card, 0, 0);
try {
stringHeader_1 = a.getString(R.styleable.Card_my_title_1);
stringHeader_2 = a.getString(R.styleable.Card_my_title_2);
drawableIcon = a.getDrawable(R.styleable.Card_my_icon);
drawableLoyoutBg = a.getDrawable(R.styleable.Card_my_bg);
} finally {
a.recycle();
}
// Setting the attributes to view.
this.textView1.setText(stringHeader_1);
this.textView2.setText(stringHeader_2);
this.icon.setImageDrawable(drawableIcon);
this.layout.setBackgroundDrawable(drawableLoyoutBg);
}
@Override
public void onWindowFocusChanged(boolean hasFocus) {
// TODO Auto-generated method stub
super.onWindowFocusChanged(hasFocus);
// Getting the height of layout.
int h = layout.getHeight();
// I can't set icon height here so I set the padding.
int p = h / 4;
this.icon.setPadding(p, p, p, p);
}
}
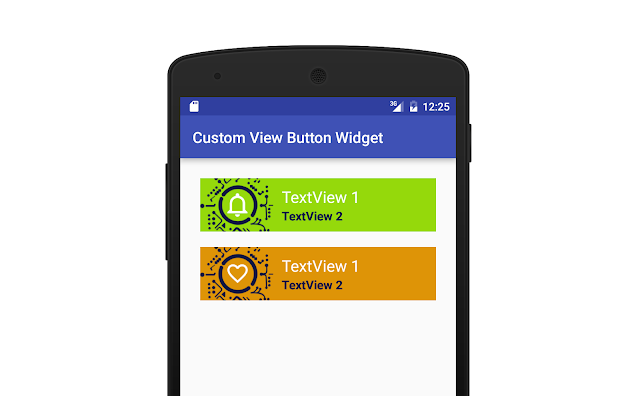
7. Add your widget in activity_main.xml.activity_main.xml<?xml version="1.0" encoding="utf-8"?>
<LinearLayout xmlns:android="http://schemas.android.com/apk/res/android"
xmlns:app="http://schemas.android.com/apk/res-auto"
android:layout_width="match_parent"
android:layout_height="match_parent"
android:orientation="vertical"
android:padding="16dp">
<androidramp.blogspot.customviewbuttonwidget.Card
android:layout_width="match_parent"
android:layout_height="70dp"
android:layout_margin="10dp"
app:my_icon="@drawable/icon_alarm"
app:my_title_1="TextView 1"
app:my_title_2="TextView 2"
app:my_bg="@color/Color1a"/>
<androidramp.blogspot.customviewbuttonwidget.Card
android:layout_width="match_parent"
android:layout_height="70dp"
android:layout_margin="10dp"
app:my_icon="@drawable/icon_heart"
app:my_title_1="TextView 1"
app:my_title_2="TextView 2"
app:my_bg="@color/Color2a" />
</LinearLayout>
8. Ther is no changes in your MainActivity.javaMainActivity.javapackage androidramp.blogspot.customviewbuttonwidget;
import android.support.v7.app.AppCompatActivity;
import android.os.Bundle;
public class MainActivity extends AppCompatActivity {
@Override
protected void onCreate(Bundle savedInstanceState) {
super.onCreate(savedInstanceState);
setContentView(R.layout.activity_main);
}
}
9. Now run and test your app.
.png)


spelling mistake in flow 2(Imageview) ha ha ........
ReplyDeleteThank you for response. :)
Deletesuper ji.... super ji... super!!!!
ReplyDeleteA custom view is as simple as inheriting from the View class and overriding the methods that need to be overridden. In this example, a custom button is implemented in this way.Android Training in chennai | Android Training|Android Training in chennai with placement | Android Training in velachery
ReplyDelete
ReplyDeleteCongratulations guys, quality information you have given!!!..Its really useful blog. Thanks for sharing this useful information..Android training in chennai with placement | Android Training in chennai |Android Training in Velachery
Thanks for sharing a worthy information in detail. This is really helpful for learning. Keep doing more.
ReplyDeleteIELTS Coaching Center in JP Nagar
IELTS Course in JP Nagar
IELTS Training in JP Nagar Bangalore
English Speaking Course in Bangalore JP Nagar
Spoken English in JP Nagar
English Speaking Classes near me
Spoken English Classes in JP Nagar Bangalore
Wonderful piece of work. Master stroke. I have become a fan of your words. Pls keep on writing.
ReplyDeletelist-your-blog
Technology
Hey Nice Blog!! Thanks For Sharing!!!Wonderful blog & good post.Its really helpful for me, waiting for a more new post. Keep Blogging!
ReplyDeleteSEO company in coimbatore
SEO Service in Coimbatore
web design company in coimbatore
kissasian apk
ReplyDeletegomovies
ReplyDeleteThanks for the informative article. This is one of the best resources I have found in quite some time.
ReplyDeleteHadoop Admin Training in Chennai
Big Data Administration Course in Chennai
french courses in chennai
pearson vue
Blockchain Training in Chennai
Ionic Training in Chennai
Hadoop Admin Training in Velachery
Hadoop Admin Training in Tambaram
This comment has been removed by the author.
ReplyDeleteThanks for this article.You can visit my website:avg mobile antivirus free download
ReplyDeleteThe article is very useful for students.
ReplyDeleteBig Data Hadoop Training In Chennai | Big Data Hadoop Training In anna nagar | Big Data Hadoop Training In omr | Big Data Hadoop Training In porur | Big Data Hadoop Training In tambaram | Big Data Hadoop Training In velachery
Thanks for this article.
ReplyDeleteAngularJS training in chennai | AngularJS training in anna nagar | AngularJS training in omr | AngularJS training in porur | AngularJS training in tambaram | AngularJS training in velachery
Thanks for a wonderful share. Your article has proved your hard work and experience you have got in this field. Brilliant .i love it reading.
ReplyDeleteweb designing training in chennai
web designing training in tambaram
digital marketing training in chennai
digital marketing training in tambaram
rpa training in chennai
rpa training in tambaram
tally training in chennai
tally training in tambaram
Thanks for sharing a worthy information in detail. This is really helpful for learning. Keep doing more...
ReplyDeletehadoop training in chennai
hadoop training in omr
salesforce training in chennai
salesforce training in omr
c and c plus plus course in chennai
c and c plus plus course in omr
machine learning training in chennai
machine learning training in omr
Try this new app WhatsApp Sniffer Apk : which is most trending now.
ReplyDeleteThanks for sharing a worthy information in detail. This is really helpful for learning. Keep doing more.
ReplyDeleteamazon web services aws training in chennai
microsoft azure training in chennai
workday training in chennai
android-training-in chennai
ios training in chennai
Amazing post thanks for sharing.
ReplyDeleteBest Apache Spark Online Course
Apache Spark Training Institute in Pune
smm panel
ReplyDeleteSmm Panel
iş ilanları
İNSTAGRAM TAKİPÇİ SATIN AL
hirdavatciburada.com
WWW.BEYAZESYATEKNİKSERVİSİ.COM.TR
Servis
tiktok jeton hilesi
kadıköy mitsubishi klima servisi
ReplyDeletekartal vestel klima servisi
ümraniye vestel klima servisi
ümraniye bosch klima servisi
beykoz lg klima servisi
üsküdar lg klima servisi
beykoz alarko carrier klima servisi
beykoz daikin klima servisi
üsküdar daikin klima servisi
I wanted to thank you for this exceptional recover!! I its total valued all minuscule piece. I have you ever bookmarked your site to try out the valuable possessions you announce. Zmodeler 3 License Crack
ReplyDeleteMost likely that is a very decent statement I were given a ton of information subsequent to dissecting powerful achievement. subject of blog is astonishing there might be a propos the whole to right of confirmation, splendid realm. Easeus Data Recovery Wizard Crack
ReplyDeleteGlorious web site! I love the way it is straightforward upon my eyes it's far. I'm contemplating the way in which I might be prompted whenever another conspicuous screen has been made. glancing through out extra new updates. Have a colossal extensive stretches of significant stretches of light hours!! Birthday Wishes Son In Law
ReplyDeletemaraş
ReplyDeletebursa
tokat
uşak
samsun
MU1U
salt likit
ReplyDeletesalt likit
1KUPT
href="https://istanbulolala.biz/">https://istanbulolala.biz/
ReplyDeleteEHVD85
tekirdağ evden eve nakliyat
ReplyDeletekocaeli evden eve nakliyat
yozgat evden eve nakliyat
osmaniye evden eve nakliyat
amasya evden eve nakliyat
7V7C
8A1E3
ReplyDeleteHatay Şehir İçi Nakliyat
Ankara Parke Ustası
Pitbull Coin Hangi Borsada
Mersin Evden Eve Nakliyat
Mamak Parke Ustası
Balıkesir Evden Eve Nakliyat
Kocaeli Lojistik
Bolu Lojistik
Hamster Coin Hangi Borsada
2639C
ReplyDeleteAlya Coin Hangi Borsada
Çerkezköy Oto Elektrik
Kalıcı Makyaj
Artvin Şehir İçi Nakliyat
Adıyaman Şehirler Arası Nakliyat
Bitcoin Nasıl Alınır
Malatya Evden Eve Nakliyat
Uşak Parça Eşya Taşıma
Nevşehir Lojistik
DF504
ReplyDeleteÇerkezköy Oto Lastik
Edirne Evden Eve Nakliyat
Maraş Parça Eşya Taşıma
Çerkezköy Çilingir
Karabük Şehirler Arası Nakliyat
Adana Parça Eşya Taşıma
Tunceli Evden Eve Nakliyat
Batman Lojistik
Ünye Fayans Ustası
A15B2
ReplyDeleteresimlimag.net
25C1B
ReplyDeleteresimli magnet
binance referans kodu
resimli magnet
binance referans kodu
resimli magnet
referans kimliği nedir
binance referans kodu
binance referans kodu
referans kimliği nedir
2C034
ReplyDeleteamiclear
0C85D
ReplyDeletetoptan mum
bitexen
kızlarla canlı sohbet
btcturk
kripto para nereden alınır
mexc
binance
kripto para haram mı
aax
7B69A
ReplyDeletekucoin
canli sohbet
bybit
bybit
kripto para haram mı
cointiger
binance
kripto para nasıl alınır
kucoin
q2wertewytruytu
ReplyDeleteصيانة افران غاز
شركة تسليك مجاري بالهفوف S3IyycmDjx
ReplyDeleteمكافحة حشرات mRLuceUFON
ReplyDeleteCustom buttons that boost visibility customized buttons
ReplyDelete