Hide Bottom Toolbar On Scroll

Smoothly hide bottom toolbar on scroll like google plus - Future Image
Google plus uses nice animation to hide bottom toolbar on scroll down to make space to view posts in full screen. So that user can easily view posts on scroll down, and the toolbar quickly returns when user scrolls up. We can achieve this by   CoordinatorLayout . The views can interact with other views inside CoordinatorLayout. Using Layout   behaviours  we can change the particular view by another view's state. By using custom layout behaviour we can do our own behaviour. In this post i will show you the example of custom layout behaviour to smoothly hide bottom toolbar on RecyclerView scroll. We can also do this behaviour with   NestedScrollView .


1.Star with creating new android studio project with empty activity
2.To get CoordinatorLayout you must import suppor design dependency
dependencies {
    compile 'com.android.support:design:24.0.0'
}
3.Remove default ActionBar by modifying styles.xml.
styles.xml<resources>
    <!-- Base application theme. -->
    <style name="AppTheme" parent="Theme.AppCompat.Light.DarkActionBar">
        <!-- Customize your theme here. -->
        <item name="colorPrimary">@color/colorPrimary</item>
        <item name="colorPrimaryDark">@color/colorPrimaryDark</item>
        <item name="colorAccent">@color/colorAccent</item>

        <item name="windowActionBar">false</item>
        <item name="windowNoTitle">true</item>
    </style>
</resources>
4.For custom CoordinatorLayout.Behaviour create class ScrollingToolbarBehavior.java
ScrollingToolbarBehavior.javapackage info.androidramp.googleplusbottomtoolbar;

import android.content.Context;
import android.support.design.widget.AppBarLayout;
import android.support.design.widget.CoordinatorLayout;
import android.support.v7.widget.Toolbar;
import android.util.AttributeSet;
import android.view.View;

/**
 * Created by Thanvandh on 09/07/2016.
 */
class ScrollingToolbarBehavior extends CoordinatorLayout.Behavior<Toolbar> {

    public ScrollingToolbarBehavior(Context context, AttributeSet attrs) {
        super(context, attrs);
    }

    @Override
    public boolean layoutDependsOn(CoordinatorLayout parent, Toolbar child, View dependency) {
        return dependency instanceof AppBarLayout;
    }

    @Override
    public boolean onDependentViewChanged(CoordinatorLayout parent, Toolbar child, View dependency) {
        if (dependency instanceof AppBarLayout) {

            int distanceToScroll = child.getHeight();

            int bottomToolbarHeight = child.getHeight();//TODO replace this with bottom toolbar height.

            float ratio = dependency.getY() / (float) bottomToolbarHeight;
            child.setTranslationY(-distanceToScroll * ratio);
        }
        return true;
    }
}
5.In your activity layout add CoordinatorLayout and Toolbar.
activity_main.xml<?xml version="1.0" encoding="utf-8"?>
<android.support.design.widget.CoordinatorLayout xmlns:android="http://schemas.android.com/apk/res/android"
    xmlns:app="http://schemas.android.com/apk/res-auto"
    xmlns:tools="http://schemas.android.com/tools"
    android:layout_width="match_parent"
    android:layout_height="match_parent"
    tools:context="info.androidramp.googleplusbottomtoolbar.MainActivity">

    <android.support.design.widget.AppBarLayout
        android:layout_width="match_parent"
        android:layout_height="wrap_content"
        android:theme="@style/ThemeOverlay.AppCompat.Dark.ActionBar">

        <android.support.v7.widget.Toolbar
            android:layout_width="match_parent"
            android:layout_height="?android:actionBarSize"
            app:layout_scrollFlags="scroll|snap|enterAlways"
            app:title="@string/app_name" />

    </android.support.design.widget.AppBarLayout>

    <android.support.v7.widget.RecyclerView
        android:id="@+id/recyclerView"
        android:layout_width="match_parent"
        android:layout_height="match_parent"
        app:layoutManager="android.support.v7.widget.LinearLayoutManager"
        app:layout_behavior="@string/appbar_scrolling_view_behavior" />

    <android.support.v7.widget.Toolbar
        android:layout_width="match_parent"
        android:layout_height="?android:actionBarSize"
        android:layout_gravity="bottom"
        android:background="@color/colorAccent"
        android:theme="@style/ThemeOverlay.AppCompat.Dark.ActionBar"
        app:contentInsetEnd="0dp"
        app:contentInsetLeft="0dp"
        app:contentInsetRight="0dp"
        app:contentInsetStart="0dp"
        app:layout_behavior="info.androidramp.googleplusbottomtoolbar.ScrollingToolbarBehavior">
        <!--TODO REPLACE PREVIOUS LINE WITH YOUR OWN BEHAVIOUR -->

        <LinearLayout
            android:layout_width="match_parent"
            android:layout_height="match_parent"
            android:orientation="horizontal">

            <TextView
                android:layout_width="0dp"
                android:layout_height="match_parent"
                android:layout_weight="1"
                android:gravity="center"
                android:text="Action1" />

            <TextView
                android:layout_width="0dp"
                android:layout_height="match_parent"
                android:layout_weight="1"
                android:gravity="center"
                android:text="Action2" />

            <TextView
                android:layout_width="0dp"
                android:layout_height="match_parent"
                android:layout_weight="1"
                android:gravity="center"
                android:text="Action3" />

        </LinearLayout>

    </android.support.v7.widget.Toolbar>

</android.support.design.widget.CoordinatorLayout>
5.Then set adapter to your RecyclerView.
MainActivity.javapackage info.androidramp.googleplusbottomtoolbar;

import android.support.v7.app.AppCompatActivity;
import android.os.Bundle;
import android.support.v7.widget.RecyclerView;
import android.view.ViewGroup;
import android.widget.TextView;

public class MainActivity extends AppCompatActivity {

    class ViewHolder extends RecyclerView.ViewHolder {
        public ViewHolder() {
            super(new TextView(getApplicationContext()));
        }
    }

    @Override
    protected void onCreate(Bundle savedInstanceState) {
        super.onCreate(savedInstanceState);
        setContentView(R.layout.activity_main);

        RecyclerView recyclerView = (RecyclerView) findViewById(R.id.recyclerView);
        recyclerView.invalidate();
        recyclerView.setAdapter(new RecyclerView.Adapter<ViewHolder>() {


            @Override
            public ViewHolder onCreateViewHolder(ViewGroup parent, int viewType) {
                return new ViewHolder();
            }

            @Override
            public void onBindViewHolder(ViewHolder holder, int position) {
                ((TextView) holder.itemView).setText("item: " + position);
                holder.itemView.setPadding(10,10,10,10);
            }

            @Override
            public int getItemCount() {
                return 50;
            }
        });
    }

}

Now run and test your application.

Loading Gear Animation Library

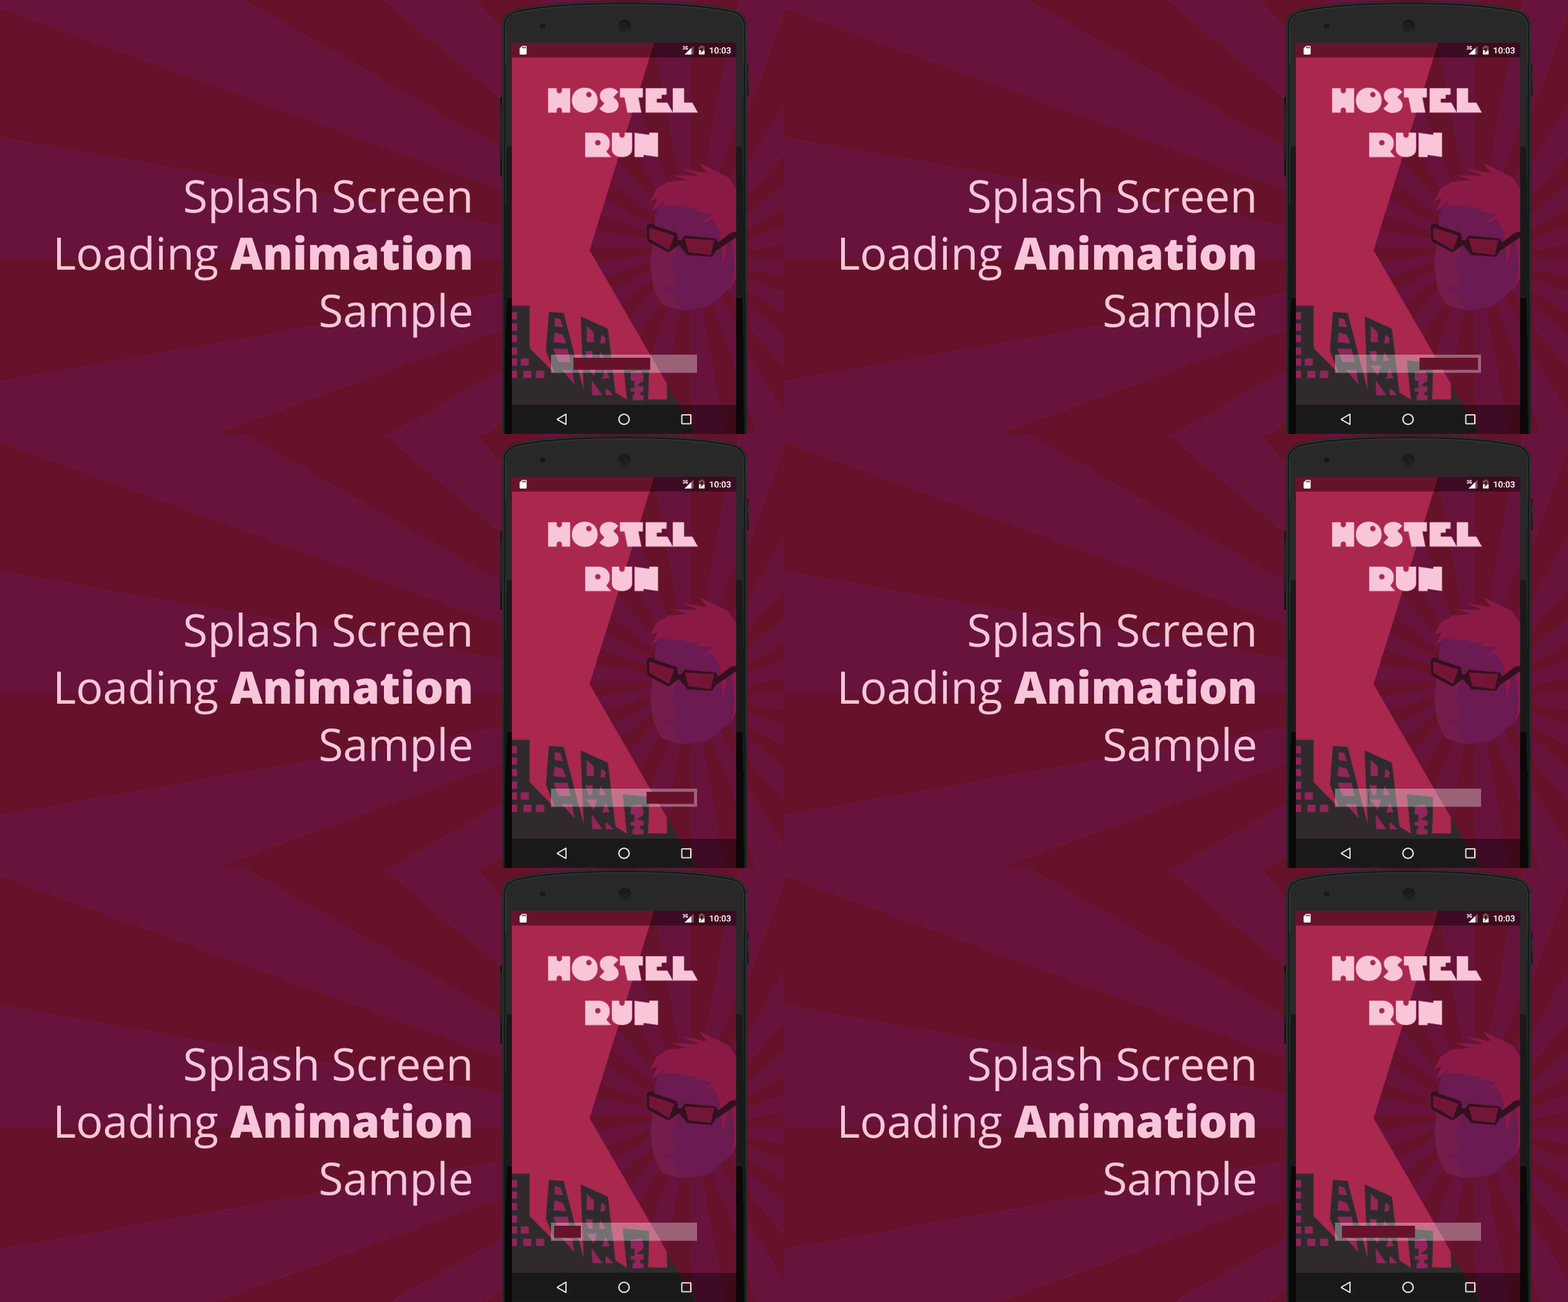
Title Splash Screen Loading Animation Sample - Future Image
In this post I come up with loading gear animation view as repository, Explaining code is hard so this time i published this as a repository so you can easily import this in your project. We can use this while content loading from internet. If you want change something like color of gear or changing the gear drawable, you can edit it. This is implemented with usual animation in android. with   BounceInterpolator .


For gradle import

dependencies {
    compile 'info.androidramp:loading-gear:1.0.4'
}
Usage
In XML file<FrameLayout
    android:layout_width="match_parent"
    android:layout_height="match_parent">
    
    //place your contents here
    
    <info.androidramp.gearload.Loading
        android:id="@+id/loading"
        android:layout_width="match_parent"
        android:layout_height="match_parent" />
</FrameLayout>
In ActivityLoading loading = (Loading) findViewById(R.id.loading);
//to sart
loading.Start();
//to cancel
loading.Cancel();

The view is visible only if method Start() is called.


Splash Screen Loading Animation

Splash Screen Loading Animation Sample - Future Image

A splash screen usually appears while a app or game launching. Splash Screen is not much important for an app. It increases the app launching time. Most of the applications are using splash screen. Gaming app mostly needs the splash screen. But some poor developers implements splash screen as an activity for an app with some delays. Splash Screen must contains minimum no.of layouts. Then only it launches quickly.
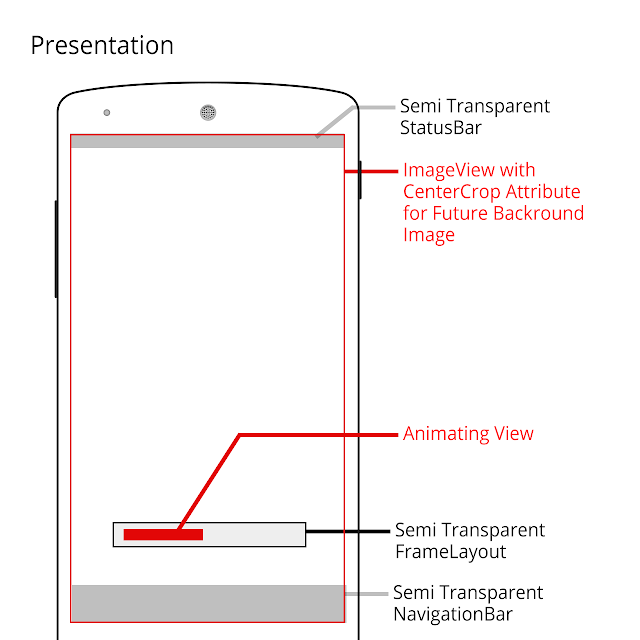
In this tutorial I simply used an AnimationSet  for an View to implement loading animation.


1. Start with creating new android Studio Project with an empty Activity.
2. Make sure your activity extends with Activity. Don’t use AppCompactActivity. Because The Theme We are gonna be use requires does not support AppCompactActivity.
3. Edit your “styles.xml” file.
styles.xml <resources>

    <style name="AppTheme" parent="android:Theme.Holo.NoActionBar.TranslucentDecor">
        <item name="android:windowBackground">@android:color/transparent</item>
        <item name="android:windowNoTitle">true</item>
    </style>

</resources>
4. Create new animation resource in anim folder
slideout.xml<?xml version="1.0" encoding="utf-8"?>
<set xmlns:android="http://schemas.android.com/apk/res/android"
    android:fillAfter="true">
    <scale
        android:duration="500"
        android:fromXScale="1.0"
        android:fromYScale="1.0"
        android:startOffset="600"
        android:toXScale="0.0"
        android:toYScale="1.0" />
</set>
5. Import necessary future drawable.
future_image.png
6. Edit your “activity_main.xml”.
activity_main.xml<?xml version="1.0" encoding="utf-8"?>
<RelativeLayout xmlns:android="http://schemas.android.com/apk/res/android"
    android:layout_width="match_parent"
    android:layout_height="match_parent">

    <ImageView
        android:layout_width="match_parent"
        android:layout_height="match_parent"
        android:scaleType="centerCrop"
        android:src="@drawable/future_image" />

    <FrameLayout
        android:layout_width="match_parent"
        android:layout_height="wrap_content"
        android:layout_alignParentBottom="true"
        android:layout_centerHorizontal="true"
        android:layout_marginBottom="100dp"
        android:layout_marginLeft="125px"
        android:layout_marginRight="125px"
        android:background="#55ffffff"
        android:padding="5dp">

        <View
            android:id="@+id/view_progress"
            android:layout_width="250px"
            android:layout_height="20dp"
            android:layout_gravity="center"
            android:background="@color/colorPrimaryDark" />
    </FrameLayout>
</RelativeLayout>
7. Implement animation in your "MainActivity.java".
MainActivity.javapackage info.androidramp.splashsample;

/**
 * Created by Thanvandh on 27/12/2015.
 */

import android.app.Activity;
import android.content.res.Resources;
import android.os.Bundle;
import android.view.View;
import android.view.animation.AnimationSet;
import android.view.animation.AnimationUtils;
import android.view.animation.ScaleAnimation;
import android.view.animation.TranslateAnimation;

public class MainActivity extends Activity {

    View viewProgress;
    AnimationSet animationSet;

    @Override
    protected void onCreate(Bundle savedInstanceState) {
        super.onCreate(savedInstanceState);
        setContentView(R.layout.activity_main);

        viewProgress = findViewById(R.id.view_progress);
        int viewWidth = viewProgress.getWidth();

        TranslateAnimation move = new TranslateAnimation(-(getScreenWidth() / 2) + viewWidth / 2, (getScreenWidth() / 2) + viewWidth / 2 + viewWidth, 0, 0);
        move.setDuration(1000);
        TranslateAnimation move1 = new TranslateAnimation(-viewWidth, 0, 0, 0);
        move1.setDuration(500);
        ScaleAnimation laftOut = new ScaleAnimation(0, 1, 1, 1);
        laftOut.setDuration(500);

        animationSet = new AnimationSet(true);
        animationSet.addAnimation(move);
        animationSet.addAnimation(move1);
        animationSet.addAnimation(laftOut);
        animationSet.addAnimation(AnimationUtils.loadAnimation(getApplicationContext(), R.anim.slideout));

        startAnimation();
    }

    private void startAnimation() {
        viewProgress.startAnimation(animationSet);
        new android.os.Handler().postDelayed(new Runnable() {
            @Override
            public void run() {
                startAnimation();
            }
        }, 1000);
    }

    public static int getScreenWidth() {
        return Resources.getSystem().getDisplayMetrics().widthPixels;
    }
}
8. Now run and test your app.
(Tested with API 23).

Custom View Button Widget


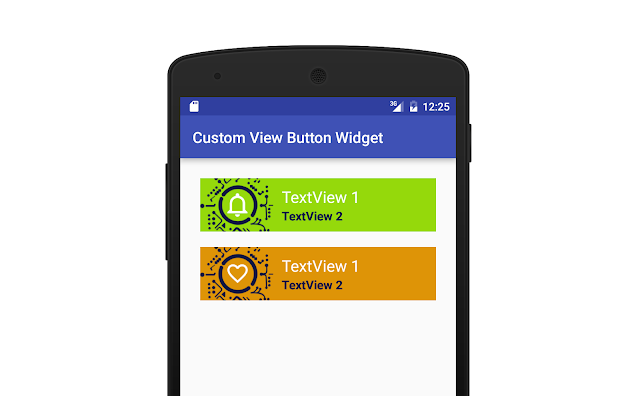
By using Custom view class We can create custom widget for our Application. Android Studio provides lot of widgets like Button, SearchView, DatePicker etc.. At the time we want some specific designed widgets with logical adjustments means we go for creating custom view widgets. We can create a new view or we also override existing view class.
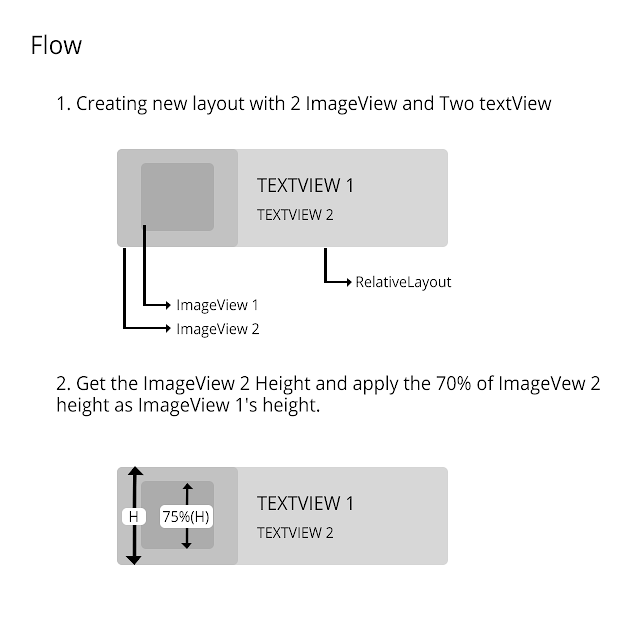
In this tutorial I override with RelativeLayout. I also tried Controlling the widgets by attributes, and widget auto adjusting logic.


1. Start with creating new android Studio Project with an empty Activity.
2. Import necessary drawables
3. Colors used
<color name="Color1a">#95d90b</color>
<color name="Color2a">#de9407</color>
<color name="Colora">#131944</color>
4. Create new xml layout for view.
card.xml<?xml version="1.0" encoding="utf-8"?>
<RelativeLayout xmlns:android="http://schemas.android.com/apk/res/android"
android:id="@+id/layout_bg"
android:layout_width="match_parent"
android:layout_height="120dp"
android:background="@color/Color1a">

<ImageView
    android:id="@+id/thumbnail"
    android:layout_width="wrap_content"
    android:layout_height="match_parent"
    android:adjustViewBounds="true"
    android:scaleType="centerInside"
    android:src="@drawable/chip_circuit" />

<LinearLayout
    android:id="@+id/linearLayout3"
    android:layout_width="match_parent"
    android:layout_height="match_parent"
    android:layout_toRightOf="@+id/thumbnail"
    android:gravity="center_vertical"
    android:orientation="vertical"
    android:paddingLeft="10dp">

    <TextView
        android:id="@+id/header"
        android:layout_width="wrap_content"
        android:layout_height="wrap_content"
        android:layout_toRightOf="@+id/thumbnail"
        android:text="TEXTVIEW 1"
        android:textColor="@android:color/white"
        android:textSize="21dp" />

    <TextView
        android:id="@+id/description"
        android:layout_width="wrap_content"
        android:layout_height="wrap_content"
        android:layout_below="@+id/header"
        android:text="TEXTVIEW 2"
        android:textColor="@color/Colora"
        android:textSize="16dp"
        android:textStyle="bold" />
</LinearLayout>

<ImageView
    android:id="@+id/icon"
    android:layout_width="wrap_content"
    android:layout_height="match_parent"
    android:padding="25dp"
    android:layout_alignParentLeft="true"
    android:layout_toLeftOf="@+id/linearLayout3"
    android:adjustViewBounds="true"
    android:scaleType="centerInside"
    android:src="@drawable/icon_alarm" />

</RelativeLayout>
5. Create new xml file under values folder called "attrs.xml".
attrs.xml<?xml version="1.0" encoding="utf-8"?>
<resources>

    <declare-styleable name="Card">
        <attr name="my_title_1" format="string" />
        <attr name="my_title_2" format="string" />
        <attr name="my_icon" format="reference" />
        <attr name="my_bg" format="reference" />
    </declare-styleable>

</resources>
6. Create new class for view.
Card.javapackage androidramp.blogspot.customviewbuttonwidget;

/**
 * Created by Thanvandh on 11-11-2015.
 */

import android.content.Context;
import android.content.res.TypedArray;
import android.graphics.drawable.Drawable;
import android.util.AttributeSet;
import android.widget.ImageView;
import android.widget.RelativeLayout;
import android.widget.TextView;

public class Card extends RelativeLayout {

    private String stringHeader_1;
    private String stringHeader_2;
    private Drawable drawableIcon;
    private Drawable drawableLoyoutBg;

    private TextView textView1;
    private TextView textView2;
    private ImageView icon;
    private RelativeLayout layout;

    public Card(Context context) {
        super(context);
        init();
    }

    public Card(Context context, AttributeSet attrs) {
        super(context, attrs);
        init(context, attrs);
    }

    private void init() {
        inflate(getContext(), R.layout.card, this);
        this.textView1 = (TextView) findViewById(R.id.header);
        this.textView2 = (TextView) findViewById(R.id.description);
        this.icon = (ImageView) findViewById(R.id.icon);
        this.layout = (RelativeLayout) findViewById(R.id.layout_bg);
    }

    private void init(Context context, AttributeSet attrs) {

        init();
        // Getting the attributes.
        TypedArray a = context.getTheme().obtainStyledAttributes(attrs,
                R.styleable.Card, 0, 0);
        try {
            stringHeader_1 = a.getString(R.styleable.Card_my_title_1);
            stringHeader_2 = a.getString(R.styleable.Card_my_title_2);
            drawableIcon = a.getDrawable(R.styleable.Card_my_icon);
            drawableLoyoutBg = a.getDrawable(R.styleable.Card_my_bg);

        } finally {
            a.recycle();
        }
        // Setting the attributes to view.
        this.textView1.setText(stringHeader_1);
        this.textView2.setText(stringHeader_2);
        this.icon.setImageDrawable(drawableIcon);
        this.layout.setBackgroundDrawable(drawableLoyoutBg);
    }

    @Override
    public void onWindowFocusChanged(boolean hasFocus) {
        // TODO Auto-generated method stub
        super.onWindowFocusChanged(hasFocus);
        // Getting the height of layout.
        int h = layout.getHeight();
        // I can't set icon height here so I set the padding.
        int p = h / 4;
        this.icon.setPadding(p, p, p, p);
    }
}
7. Add your widget in activity_main.xml.
activity_main.xml<?xml version="1.0" encoding="utf-8"?>
<LinearLayout xmlns:android="http://schemas.android.com/apk/res/android"
    xmlns:app="http://schemas.android.com/apk/res-auto"
    android:layout_width="match_parent"
    android:layout_height="match_parent"
    android:orientation="vertical"
    android:padding="16dp">

    <androidramp.blogspot.customviewbuttonwidget.Card
        android:layout_width="match_parent"
        android:layout_height="70dp"
        android:layout_margin="10dp"
        app:my_icon="@drawable/icon_alarm"
        app:my_title_1="TextView 1"
        app:my_title_2="TextView 2"
        app:my_bg="@color/Color1a"/>

    <androidramp.blogspot.customviewbuttonwidget.Card
        android:layout_width="match_parent"
        android:layout_height="70dp"
        android:layout_margin="10dp"
        app:my_icon="@drawable/icon_heart"
        app:my_title_1="TextView 1"
        app:my_title_2="TextView 2"
        app:my_bg="@color/Color2a" />

</LinearLayout>
8. Ther is no changes in your MainActivity.java
MainActivity.javapackage androidramp.blogspot.customviewbuttonwidget;

import android.support.v7.app.AppCompatActivity;
import android.os.Bundle;

public class MainActivity extends AppCompatActivity {

    @Override
    protected void onCreate(Bundle savedInstanceState) {
        super.onCreate(savedInstanceState);
        setContentView(R.layout.activity_main);
    }
}
9. Now run and test your app.

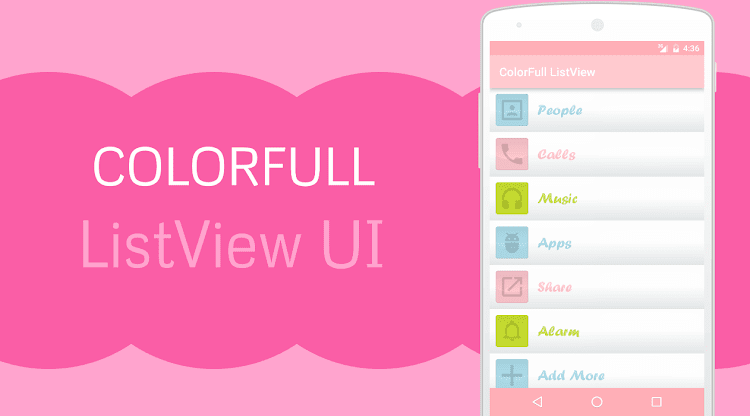
Colorful ListView Template


Android ListView is the great tool to show items in list because it reduces the cache level of  application. Designing ListView User Interface is the hardest part for some developers. It is better if ListView templates available in on-line.
Here I Shared my ListView UI. In my ListView UI I used different color TextView in different list Items. I also used custom font for TextView. In this ListView the Icons not in color. The Icons get color at the run time. I tinted the icons in MULTIPLY mode. Icons are gray colored placed in drawable directory. I used gradient color for the TextView present in the ListView. And the ListView background is the gray gradient and the gradient level is reduced at the time it get click.
This UI is looks like designed for baby. I attache the PSD file in this project for use your custom icon. Let’s start with code.1.Create now android project with empty activity.
2.Create new xml Drawables.
list_gradient_normal.xml<?xml version="1.0" encoding="utf-8"?>
<shape xmlns:android="http://schemas.android.com/apk/res/android">
    <gradient
        android:angle="90"
        android:startColor="#e3e7e8"
        android:centerColor="#fdfdfd"
        android:endColor="#fdfdfd" />
</shape>
list_gradient_pressed.xml<?xml version="1.0" encoding="utf-8"?>
<shape xmlns:android="http://schemas.android.com/apk/res/android">
    <gradient
        android:angle="90"
        android:endColor="#fdfdfd"
        android:centerColor="#fdfdfd"
        android:startColor="#f5f8f9" />
</shape>
list_gradient.xml<?xml version="1.0" encoding="utf-8"?>
<selector xmlns:android="http://schemas.android.com/apk/res/android">
    <item android:state_pressed="true" android:drawable="@drawable/list_gradient_pressed" />
    <item android:drawable="@drawable/list_gradient_normal" />
</selector>
3.Paste your list icons in drawable folder.
4.Create new layout file for single list item.
list_item.xml<?xml version="1.0" encoding="utf-8"?>
<LinearLayout xmlns:android="http://schemas.android.com/apk/res/android"
    android:layout_width="fill_parent"
    android:layout_height="80dp"
    android:background="@drawable/list_gradient"
    android:gravity="center"
    android:orientation="horizontal">

    <ImageView
        android:id="@+id/likes_list_image"
        android:layout_width="55dp"
        android:layout_height="55dp"
        android:layout_margin="10dp"
        android:src="@drawable/icon_add"
        android:tint="@color/list_color_2a"
        android:tintMode="multiply" />

    <TextView
        android:id="@+id/likes_list_name"
        android:layout_width="match_parent"
        android:layout_height="wrap_content"
        android:layout_marginLeft="5dp"
        android:text="Add more"
        android:textSize="25dp" />

</LinearLayout>
5.Add ListView wiget in activity_main.xml.
activity_main.xml<?xml version="1.0" encoding="utf-8"?>
<RelativeLayout xmlns:android="http://schemas.android.com/apk/res/android"
    xmlns:tools="http://schemas.android.com/tools"
    android:layout_width="match_parent"
    android:layout_height="match_parent"
    tools:context=".MainActivity">

    <ListView
        android:layout_width="match_parent"
        android:layout_height="match_parent"
        android:id="@+id/stock_list" />
</RelativeLayout>
6.Add colors to colors.xml file in Values directory.
colors.xml<?xml version="1.0" encoding="utf-8"?>
<resources>
    <color name="colorPrimary">#ffcacf</color>
    <color name="colorPrimaryDark">#ffafb7</color>
    <color name="colorAccent">#FF4081</color>

    <color name="list_color_1">#b3e1ee</color>
    <color name="list_color_1a">#6ac6dd</color>

    <color name="list_color_2">#ffcacf</color>
    <color name="list_color_2a">#fea1ac</color>

    <color name="list_color_3">#cde431</color>
    <color name="list_color_3a">#a8ca02</color>

</resources>
7.If you want change color of StatusBar, ActionBar and NavigationBar Add these values to styles.xml.
styles.xml<resources xmlns:tools="http://schemas.android.com/tools">

    <!-- Base application theme. -->
    <style name="AppTheme" parent="Theme.AppCompat.Light.DarkActionBar">
        <!-- Customize your theme here. -->
        <item name="colorPrimary">@color/colorPrimary</item>
        <item name="colorPrimaryDark">@color/colorPrimaryDark</item>
        <item name="android:navigationBarColor" tools:targetApi="21">@color/colorPrimaryDark</item>
    </style>

</resources>
8. Create assets directory and paste the forte.ttf file.
forte.ttf
9. Create New class AppController.java We use this class for improve the performance of font applying.
AppController.javapackage com.androidramp.colorfulllistview;

import android.app.Application;
import android.graphics.Typeface;
import android.widget.TextView;

public class AppController extends Application {

    public static Typeface font;
    public static String forte = "forte.ttf";

    @Override
    public void onCreate() {
        super.onCreate();
        font = Typeface.createFromAsset(getAssets(), forte);
    }

    public static void Forte(TextView textView) {
        textView.setTypeface(AppController.font);
    }
}
10.Add class Appcontroller as name of AndroidManifest.xml
AndroidManifest.xml<?xml version="1.0" encoding="utf-8"?>
<manifest xmlns:android="http://schemas.android.com/apk/res/android"
    package="com.androidramp.colorfulllistview" >

    <application
        android:allowBackup="true"
        android:icon="@mipmap/ic_launcher"
        android:label="@string/app_name"
        android:supportsRtl="true"
        android:name=".AppController"
        android:theme="@style/AppTheme" >
        <activity android:name=".MainActivity" >
            <intent-filter>
                <action android:name="android.intent.action.MAIN" />

                <category android:name="android.intent.category.LAUNCHER" />
            </intent-filter>
        </activity>
    </application>

</manifest>
11. Create new class List.java.
List.javapackage com.androidramp.colorfulllistview;

public class List {

    private int imageId;
    private String name;

    public List() {
        // TODO Auto-generated constructor stub
    }

    public String getName() {
        return name;
    }

    public void setName(String name) {
        this.name = name;
    }

    public void setImageId(int id) {
        this.imageId = id;
    }

    public int getImageId() {
        return imageId;
    }
}
12. Create new class ListAdapter.java.
ListAdapter.javapackage com.androidramp.colorfulllistview;

import android.content.Context;
import android.graphics.LinearGradient;
import android.graphics.Shader;
import android.view.LayoutInflater;
import android.view.View;
import android.view.ViewGroup;
import android.widget.ArrayAdapter;
import android.widget.ImageView;
import android.widget.TextView;

import java.util.ArrayList;

public class ListAdapter extends ArrayAdapter {

    ArrayList arrayList;
    LayoutInflater vi;
    int Resource;
    ViewHolder holder;
    Context cc;

    public ListAdapter(Context context, int resource, ArrayList objects) {
        super(context, resource, objects);
        cc = context;
        vi = (LayoutInflater) context
                .getSystemService(Context.LAYOUT_INFLATER_SERVICE);

        Resource = resource;
        arrayList = objects;
    }

    @Override
    public View getView(int position, View convertView, ViewGroup parent) {
        View v = convertView;
        if (v == null) {
            holder = new ViewHolder();
            v = vi.inflate(Resource, null);

            holder.tvName = (TextView) v.findViewById(R.id.likes_list_name);
            holder.ivImage = (ImageView) v.findViewById(R.id.likes_list_image);

            v.setTag(holder);
        } else {
            holder = (ViewHolder) v.getTag();
        }

        holder.tvName.setText(arrayList.get(position).getName());
        holder.ivImage.setImageDrawable(cc.getResources().getDrawable(arrayList.get(position).getImageId()));

        AppController.Forte(holder.tvName);
        Color(holder.tvName, position);

        return v;
    }

    static class ViewHolder {
        public TextView tvName;
        public ImageView ivImage;

    }

    private void Color(TextView tv, int position) {

        int mod = position % 3;

        switch (mod) {
            case 0:
                GradientColor(tv, GetColor(R.color.list_color_1), GetColor(R.color.list_color_1a));
                holder.ivImage.setColorFilter(cc.getResources().getColor(R.color.list_color_1), android.graphics.PorterDuff.Mode.MULTIPLY);
                break;
            case 1:
                GradientColor(tv, GetColor(R.color.list_color_2), GetColor(R.color.list_color_2a));
                holder.ivImage.setColorFilter(cc.getResources().getColor(R.color.list_color_2), android.graphics.PorterDuff.Mode.MULTIPLY);
                break;
            case 2:
                GradientColor(tv, GetColor(R.color.list_color_3), GetColor(R.color.list_color_3a));
                holder.ivImage.setColorFilter(cc.getResources().getColor(R.color.list_color_3), android.graphics.PorterDuff.Mode.MULTIPLY);
                break;
            default:ffff
                break;
        }
    }

    private void GradientColor(TextView tv, int color1, int color2) {
        Shader shader = new LinearGradient(
                0, 0, 0, tv.getTextSize(),
                color1, color2, Shader.TileMode.CLAMP);
        tv.getPaint().setShader(shader);
    }

    private int GetColor(int id) {
        return cc.getResources().getColor(id);
    }

}
13. And this goes to your MainActivity.
MainActivity.javapackage com.androidramp.colorfulllistview;

import android.os.Bundle;
import android.support.v7.app.AppCompatActivity;
import android.widget.ListView;

import java.util.ArrayList;

public class MainActivity extends AppCompatActivity {

    ArrayList arrayList;
    ListAdapter adapter;

    String[] title = new String[]{
            "People",
            "Calls",
            "Music",
            "Apps",
            "Share",
            "Alarm",
            "Add More",
    };

    int[] imageId = new int[]{
            R.drawable.icon_people,
            R.drawable.icon_calls,
            R.drawable.icon_musiq,
            R.drawable.icon_apps,
            R.drawable.icon_share,
            R.drawable.icon_alarm,
            R.drawable.icon_add,
    };

    @Override
    protected void onCreate(Bundle savedInstanceState) {
        super.onCreate(savedInstanceState);
        setContentView(R.layout.activity_main);

        // custom list
        ListView listView = (ListView) findViewById(R.id.stock_list);
        arrayList = new ArrayList<>();
        adapter = new ListAdapter(getApplicationContext(), R.layout.list_item, arrayList);

        listView.setDividerHeight(1);
        listView.setAdapter(adapter);

        for (int i = 0; i < title.length; i++) {

            List adpacksList = new List();
            adpacksList.setImageId(imageId[i]);
            adpacksList.setName(title[i]);
            arrayList.add(adpacksList);

        }
        adapter.notifyDataSetChanged();
    }

}

Now run and test your project.

Walking Man - AnimatedVectorDrawable


AnimatedVectorDrawable  Added in Lollipop. But still they not release the compatible library for pre Lollipop devices. And there is no tool to implement AnimatedVectorDrawable.
If you use AnimatedVectorDrawable in your app, you need to set minimum API level to 21. So People still using the old xml drawable. But we want to explore this for Future development.
First you want to learn how to draw vector drawable in xml. To draw VectorDrawable you want to learn SVG path. If you have SVG file, you can convert it to VectorDrawable using onlinetool. I Learned SVG pathdata at here. You can use adobe Illustrator to draw your Drawable as SVG.
But I think if you are manually draw SVG path in xml means it will help you at the time you like to try pathdata property of animation. Let’s Quick Start.

1.First Create now android project with minimum API level 21 :P
2Create new Drawable.
drawable.xml<?xml version="1.0" encoding="utf-8"?>
<vector xmlns:android="http://schemas.android.com/apk/res/android"
    android:width="500dp"
    android:height="500dp"
    android:viewportHeight="100"
    android:viewportWidth="100">

    <path
        android:pathData="m0,90 l100,0 "
        android:strokeColor="#269753"
        android:strokeWidth="30" />

    <group
        android:name="head"
        android:pivotX="49"
        android:pivotY="40"
        android:rotation="0">
        <path
            android:fillColor="#FCF38D"
            android:pathData="M 53.032 23.053 L 53.032 27.661 L 54.645 30.656 L 53.032 30.656 L 53.032 32.642 L 52.354 32.997 L 53.241 33.234 L 53.241 33.647 L 52.886 33.647 L 53.122 35.954 L 47.15 35.126 L 44.903 31.755 L 43.78 28.681 L 44.371 23.359 L 46.914 21.881 L 50.284 21.644 Z" />
        <path
            android:fillColor="#A09D75"
            android:pathData="M 50.107 27.853 L 51.644 27.853 L 50.875 28.562 Z" />
        <path
            android:fillColor="#A09D75"
            android:pathData="M 49.456 27.498 L 50.402 27.084 L 51.94 27.084 Z" />
        <path
            android:fillColor="#A09D75"
            android:pathData="M 45.672 31.933 L 44.726 32.465 L 42.42 26.404 L 42.479 23.181 L 44.903 20.639 L 46.677 20.639 L 48.333 20.639 L 50.107 20.343 L 50.875 20.698 L 51.644 21.644 L 52.413 21.644 L 52.708 22.117 L 51.94 23.063 L 50.698 23.3 L 49.456 24.364 L 49.212 26.02 L 48.628 27.498 L 48.096 28.799 L 48.037 29.627 L 47.564 29.154 L 46.736 28.208 L 45.554 28.799 Z" />
    </group>

    <group
        android:name="hand_b"
        android:pivotX="53"
        android:pivotY="40"
        android:rotation="0">
        <group
            android:name="raw_hand_b"
            android:pivotX="53.955"
            android:pivotY="49.741"
            android:rotation="-25">
            <path
                android:fillColor="#FCF38D"
                android:pathData="M 53.566 39.074 C 54.7335299611 39.074 55.68 43.1719376848 55.68 48.227 C 55.68 53.2820623152 54.7335299611 57.38 53.566 57.38 C 52.3984700389 57.38 51.452 53.2820623152 51.452 48.227 C 51.452 43.1719376848 52.3984700389 39.074 53.566 39.074 Z" />
        </group>
        <path
            android:fillColor="#E41672"
            android:pathData="M56.143,46.579c0.181,0.563-4.911,4.433-5.743,1.843c-1.457-4.54-1.353-8.632,0.233-9.142
C52.218,38.772,54.685,42.04,56.143,46.579z" />
    </group>

    <group
        android:name="leg_b"
        android:pivotX="49"
        android:pivotY="59"
        android:rotation="0">
        <group
            android:name="leg_b_g"
            android:pivotX="55"
            android:pivotY="68"
            android:rotation="0">
            <group
                android:name="leg_b_gg"
                android:pivotX="55"
                android:pivotY="80"
                android:rotation="0">
                <path
                    android:fillColor="#333333"
                    android:pathData="M54.377,78.405l0.394,4.767c0,0,1.52,0.006,3.765-0.28c2.245-0.286,4.499-0.506,6.185-1.337
c1.877-0.925,1.509-2.892-0.936-2.938c-4.082-0.077-5.606,2.584-6.798,1.65s-0.194-2.432-0.194-2.432L54.377,78.405z" />
            </group>
            <path
                android:fillColor="#34111D"
                android:pathData="M55.608,67.171l0.613,0.718l0.974,11.818l-4.029,0.95l-0.832-11.243l-0.209-0.537
C52.126,68.876,52.097,67.513,55.608,67.171z" />
        </group>
        <path
            android:fillColor="#34111D"
            android:pathData="M53.104,58.186l3.107,10.21l-0.169,0.479l-3.625,1.25L52.2,69.554l-4.067-9.596
C48.133,59.959,49.576,58.201,53.104,58.186z" />
    </group>

    <group
        android:name="leg_f"
        android:pivotX="49"
        android:pivotY="59"
        android:rotation="0">
        <group
            android:name="leg_f_g"
            android:pivotX="49"
            android:pivotY="68"
            android:rotation="0">
            <group
                android:name="leg_f_gg"
                android:pivotX="43"
                android:pivotY="80"
                android:rotation="0">
                <path
                    android:fillColor="#4A4A4A"
                    android:pathData="M43.873,77.655l-1.963,4.362c0,0,1.328,0.741,3.43,1.578c2.103,0.836,6.554,1.879,6.059,1.825
c-0.04-0.004,3.82-1.165,0.604-3.024c-3.535-2.044-6.156-0.453-6.747-1.847c-0.591-1.394,1.008-2.222,1.008-2.222L43.873,77.655z" />
            </group>
            <path
                android:fillColor="#511025"
                android:pathData="M51.103,69.211l-0.157,0.03l-4.868,10.813l-3.985-1.119l4.715-10.241l0.113-0.322
C46.92,68.371,48.057,65.407,51.103,69.211z" />
        </group>
        <path
            android:fillColor="#511025"
            android:pathData="M51.317,59.224l-0.053,9.323l-0.347,0.078l-4,0.125l0.173-0.292l-1.024-10.372
C46.066,58.086,47.871,55.777,51.317,59.224z" />
    </group>

    <group android:name="body">
        <path
            android:fillColor="#FCF38D"
            android:pathData="M 49.212 35.954 C 51.7917220665 35.954 53.883 40.9308027209 53.883 47.07 C 53.883 53.2091972791 51.7917220665 58.186 49.212 58.186 C 46.6322779335 58.186 44.541 53.2091972791 44.541 47.07 C 44.541 40.9308027209 46.6322779335 35.954 49.212 35.954 Z" />
        <path
            android:fillColor="#FCF38D"
            android:pathData="M 49.456 33.529 C 50.4683379464 33.529 51.289 34.3496620536 51.289 35.362 C 51.289 36.3743379464 50.4683379464 37.195 49.456 37.195 C 48.4436620536 37.195 47.623 36.3743379464 47.623 35.362 C 47.623 34.3496620536 48.4436620536 33.529 49.456 33.529 Z" />
        <path
            android:fillColor="#E41672"
            android:pathData="M 51.94 37.195 L 46.441 35.687 L 46.441 37.195 L 50.875 38.437 Z" />
        <path
            android:fillColor="#511025"
            android:pathData="M 49.19 54.106 C 51.7017910422 54.106 53.738 55.5489862513 53.738 57.329 C 53.738 59.1090137487 51.7017910422 60.552 49.19 60.552 C 46.6782089578 60.552 44.642 59.1090137487 44.642 57.329 C 44.642 55.5489862513 46.6782089578 54.106 49.19 54.106 Z" />
        <path
            android:fillColor="#3A52A3"
            android:pathData="M44.541,57.122l-0.761-8.813l0.761-8.098l1.899-3.016l4.435,1.242h1.279c0,0,1.862,2.473,1.69,7.21
s0.011,11.475,0.011,11.475l-2.566,1.537C51.289,58.659,45.716,58.186,44.541,57.122z" />
    </group>

    <group
        android:name="hand_f"
        android:pivotX="49"
        android:pivotY="40"
        android:rotation="0">
        <group
            android:name="raw_hand_f"
            android:pivotX="45.955"
            android:pivotY="49.741"
            android:rotation="15">
            <path
                android:fillColor="#FCF38D"
                android:pathData="M 45.955 39.741 C 47.1225299611 39.741 48.069 43.8389376848 48.069 48.894 C 48.069 53.9490623152 47.1225299611 58.047 45.955 58.047 C 44.7874700389 58.047 43.841 53.9490623152 43.841 48.894 C 43.841 43.8389376848 44.7874700389 39.741 45.955 39.741 Z" />
        </group>
        <path
            android:fillColor="#E41672"
            android:pathData="M49.008,49.064c-0.183,0.562-6.577,0.723-5.736-1.864c1.473-4.535,3.952-7.793,5.536-7.279
C50.392,40.437,50.481,44.53,49.008,49.064z" />
    </group>

</vector>
3.Create anim folder and create new animation.
anti_clock.xml<objectAnimator
    xmlns:android="http://schemas.android.com/apk/res/android"
    android:duration="1000"
    android:propertyName="rotation"
    android:valueFrom="10"
    android:repeatCount="10"
    android:repeatMode="reverse"
    android:valueTo="-20"/>
anti_clock_quick.xml<objectAnimator
    xmlns:android="http://schemas.android.com/apk/res/android"
    android:duration="500"
    android:propertyName="rotation"
    android:valueFrom="0"
    android:repeatCount="20"
    android:repeatMode="reverse"
    android:valueTo="-20"/>
clock.xml<objectAnimator
    xmlns:android="http://schemas.android.com/apk/res/android"
    android:duration="1000"
    android:propertyName="rotation"
    android:valueFrom="0"
    android:repeatCount="10"
    android:repeatMode="reverse"
    android:valueTo="30"/>
clock_quick.xml<objectAnimator
    xmlns:android="http://schemas.android.com/apk/res/android"
    android:duration="500"
    android:propertyName="rotation"
    android:valueFrom="0"
    android:repeatCount="20"
    android:repeatMode="reverse"
    android:valueTo="20"/>
4.Now create new drawable file
animated_drawable.xml<animated-vector
    xmlns:android="http://schemas.android.com/apk/res/android"
    android:drawable="@drawable/drawable">

    <target
        android:animation="@anim/clock"
        android:name="hand_b"/>
    <target
        android:animation="@anim/anti_clock"
        android:name="hand_f"/>
    <target
        android:animation="@anim/clock"
        android:name="leg_b"/>
    <target
        android:animation="@anim/anti_clock"
        android:name="leg_f"/>
    <target
        android:animation="@anim/clock_quick"
        android:name="leg_b_g"/>
    <target
        android:animation="@anim/clock_quick"
        android:name="leg_f_g"/>
    <target
        android:animation="@anim/anti_clock_quick"
        android:name="leg_f_gg"/>
    <target
        android:animation="@anim/anti_clock_quick"
        android:name="leg_b_gg"/>

</animated-vector>
5.Edit your activity_main.xml like this.
activity_main.xml<?xml version="1.0" encoding="utf-8"?>
<RelativeLayout xmlns:android="http://schemas.android.com/apk/res/android"
    xmlns:tools="http://schemas.android.com/tools" android:layout_width="match_parent"
    android:layout_height="match_parent" 
    android:background="@android:color/white" tools:context=".MainActivity">

    <ImageView
        android:layout_width="match_parent"
        android:layout_height="match_parent"
        android:id="@+id/imageView"
        android:src="@drawable/animated_drawable" />
</RelativeLayout>
6. And this goes to your MainActivity.
MainActivity.javapackage in.spro.animatedvectordrawable;

import android.graphics.drawable.Animatable;
import android.graphics.drawable.Drawable;
import android.support.v7.app.AppCompatActivity;
import android.os.Bundle;
import android.view.View;
import android.widget.ImageView;

public class MainActivity extends AppCompatActivity {
    ImageView animatedView;
    private Drawable drawable;
    @Override
    protected void onCreate(Bundle savedInstanceState) {
        super.onCreate(savedInstanceState);
        setContentView(R.layout.activity_main);
        animatedView = (ImageView) findViewById(R.id.imageView);
        drawable = animatedView.getDrawable();
        ((Animatable) drawable).start();
        animatedView.setOnClickListener(new View.OnClickListener() {
            @Override
            public void onClick(View v) {
                if (((Animatable) drawable).isRunning()) {
                    ((Animatable) drawable).stop();
                } else {
                    ((Animatable) drawable).start();
                }
            }
        });
    }
}

Now press Shift + f10.

ListView with EditText


Placing EditText in ListView giving us some problems like edited text gone, randomly changing the text and focus changing. These all are happening because of the layout reusability.
In this post we are compensate the problems. To compensating the edited text gone problem we are using array list to store the edited text from ListView on the time the particular EditText changed. And we are setting the string from the array to EditText at the time the Layout reusing. This function dynamically happen on the time u scroll the ListView and after EditText changed. You Will Clearly understand at the time you see the code.
Solution
1. First we want to create Array or HashMap to store and retrieving  EditText.
String s[] = new String[]{
        "", "", "", "", "", "", "", "", "", "", "", "", ""
};
2. Now add this syntax in your list adapter.
editText.setText(values[position]);

editText.addTextChangedListener(new TextWatcher() {
    @Override
    public void beforeTextChanged(CharSequence s, int start, int count, int after) {

    }

    @Override
    public void onTextChanged(CharSequence s, int start, int before, int count) {

    }

    @Override
    public void afterTextChanged(Editable s) {
        values[position] = editText.getText().toString();
    }
});
Sample Project
1. Create new project in android studio and edit  activity_main.xml like mentioned below.
activity_main.xml<?xml version="1.0" encoding="utf-8"?>
<RelativeLayout xmlns:android="http://schemas.android.com/apk/res/android"
    xmlns:tools="http://schemas.android.com/tools"
    android:layout_width="match_parent"
    android:layout_height="match_parent" tools:context=".MainActivity">

    <ListView
        android:layout_width="match_parent"
        android:layout_height="match_parent"
        android:id="@+id/listView"/>
</RelativeLayout>
2. Create new layout list_item.xml.
list_item.xml<?xml version="1.0" encoding="utf-8"?>
<LinearLayout xmlns:android="http://schemas.android.com/apk/res/android"
    android:layout_width="match_parent"
    android:layout_height="match_parent">
    
    <EditText
        android:layout_width="match_parent"
        android:id="@+id/edit_text"
        android:layout_height="wrap_content" />
</LinearLayout>
3. Edit the MainActivity.java like mentioned below.
MainActivity.javapackage in.spro.listviewedittext;
import android.support.v7.app.AppCompatActivity;
import android.os.Bundle;
import android.widget.ListView;
import java.util.ArrayList;

public class MainActivity extends AppCompatActivity {

    String s[] = new String[]{
            "1", "2", "3", "4", "5", "6", "7", "8", "9", "10", "11", "12", "13", "14", "15", "16", "17", "18", "19"
    };
    final ArrayList<String> list = new ArrayList<>();

    @Override
    protected void onCreate(Bundle savedInstanceState) {
        super.onCreate(savedInstanceState);
        setContentView(R.layout.activity_main);

        for (int i = 0; i < s.length; i++) {
            list.add(s[i]);
        }

        ListView listView = (ListView) findViewById(R.id.listView);
        MyListAdapter adapter = new MyListAdapter(this, s);
        listView.setAdapter(adapter);
    }
}
4. Create adapter class MyListAdapter.java for ListView like mentioned below.
MyListAdapter.javapackage in.spro.listviewedittext;
import android.content.Context;
import android.text.Editable;
import android.text.TextWatcher;
import android.view.LayoutInflater;
import android.view.View;
import android.view.ViewGroup;
import android.widget.ArrayAdapter;
import android.widget.EditText;

public class MyListAdapter extends ArrayAdapter<String> {
    private final Context context;
    private final String[] values;

    public MyListAdapter(Context context, String[] values) {
        super(context, R.layout.list_item, values);
        this.context = context;
        this.values = values;
    }

    @Override
    public View getView(final int position, View convertView, ViewGroup parent) {

        LayoutInflater inflater = (LayoutInflater) context
                .getSystemService(Context.LAYOUT_INFLATER_SERVICE);

        View rowView = inflater.inflate(R.layout.list_item, parent, false);

        final EditText editText = (EditText) rowView.findViewById(R.id.edit_text);

        editText.setText(values[position]);

        editText.addTextChangedListener(new TextWatcher() {
            @Override
            public void beforeTextChanged(CharSequence s, int start, int count, int after) {

            }

            @Override
            public void onTextChanged(CharSequence s, int start, int before, int count) {

            }

            @Override
            public void afterTextChanged(Editable s) {
                values[position] = editText.getText().toString();
            }
        });

        return rowView;
    }
}
Now run your project and enjoy the "EditText in ListView".